Kristen TenDyke Lacy Crochet Kerchief Free Pattern
Kristen TenDyke Lacy Crochet Kerchief Free Pattern
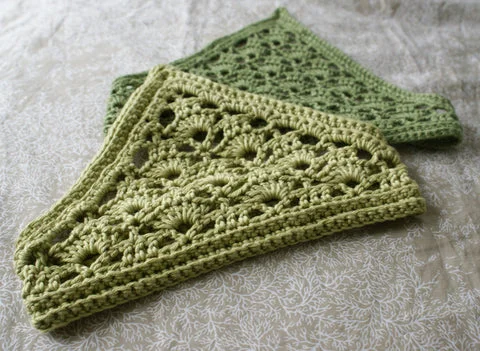
Looking for a vintage-inspired piece to elevate your outfit? This beautiful Lacy Crochet Kerchief by Kristen TenDyke is a fantastic project that perfectly balances delicate lace with a structured design! It uses a lovely shell-like stitch pattern that creates an incredibly intricate look without being overly complicated. It’s the perfect light layer to keep your hair out of your face on a breezy day or just to add a touch of romance to a casual jeans-and-t-shirt look.
This kerchief features a clever construction: it begins with a long, stabilizing band that includes the built-in ties, and then the gorgeous lacy triangle is worked directly off the bottom edge of that band. This means no fiddly seaming or attaching ties at the end! It’s a wonderful project for crocheters who are comfortable with basic stitches and want to try their hand at a more advanced-looking lace motif. Pick out your favorite smooth, DK weight yarn and start crocheting your new favorite summer accessory!
Lacy Crochet Kerchief – Free Pattern March 9, 2022 17:31
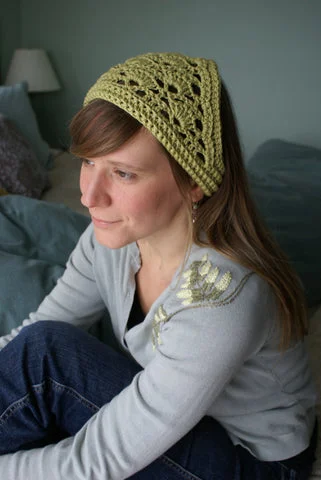
This versatile pattern may be used with nearly any yarn. You can stick with the gauge and numbers that are given, or put your math-hat on and crunch a few numbers to the formulas given to use any yarn at any gauge. The band is worked in rows, to fit around the head, then the lace for the triangle is centered on the band and worked outward. Then the final rows are worked over the band and the lacy triangle. There’s a simple seam, then it’s done!
Check out the pattern on Ravelry.
Pattern
Band
Ch 72 (96) or until length fits comfortably around head, working an even number of chs.
Set-up Row (RS): Sc into second ch from hook, then in each ch across—71 (95) sc (or desired odd number of sc).
Row 1: Ch 1, sc tbl of each sc across.
Rep the last row 2 more times, ending after a WS row.
Pm into the first and last st of the center 41 (57) sts, or approx 4⁄7 of the total length, being sure the center sts are a multiple of 8 sts + 1 (for example: 33, 41, 49, 57 and 65 are all a multiple of 8 sts + 1)—15 (20) sc are on each side of the markers; or the (desired number of sts – center sts) ÷ 2.
Pull the other end of your center-pull ball, or use your second ball of yarn, and join it with a sl st into both, front and back, strands of the first marked st. The yarn rem at beg of row will be worked later, do not cut.
Triangle
Set-up Row (RS): Ch 4 (counts as dc, ch 1), sk 2 sc, dc into each of the next 3 sc, ch 1, *sk 2 sc, [dc, ch 3, dc] into next sc, ch 1, sk 2, dc into each of the next 3 sc, ch 1; rep from * until 2 sts before next marked sc, sk 2, dc into marked sc.
Keep the markers in place.
Row 1 (WS): Ch 4 (counts as dc, ch 1), sk 2 dc, dc into next dc, *ch 1, dc 7 into ch-3 sp, ch 1, sk 2 dc, dc into next dc; rep from * to last dc, dc into top of tch.
Row 2 (RS): Sk, 1 dc, sl st into next dc, ch 4 (counts as dc, ch 1), sk 2 dc, dc into each of the next 3 dc, ch 1, *sk 2 dc, [dc, ch 3, dc] into next dc, ch 1, sk 2 dc, dc into each of the next 3 dc, ch 1; rep from * to last 4 dc, sk 2 dc, dc into next dc, leave tch unworked.
Rep the last 2 rows 3 (5) more times, or until it can no longer be worked as described.
Finishing Row: Ch 4, sk 2 dc, dc into next dc, sk 2 dc, dc into top of tch, turn, sk 1 dc, sl st into next dc. Fasten off, cut yarn.