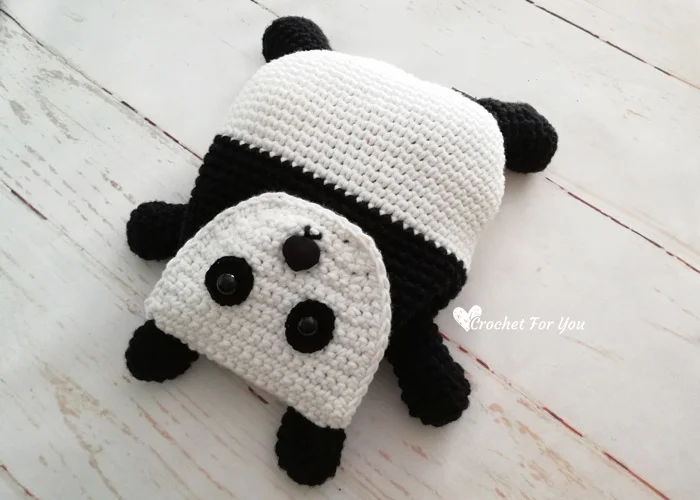
Fleece Panda
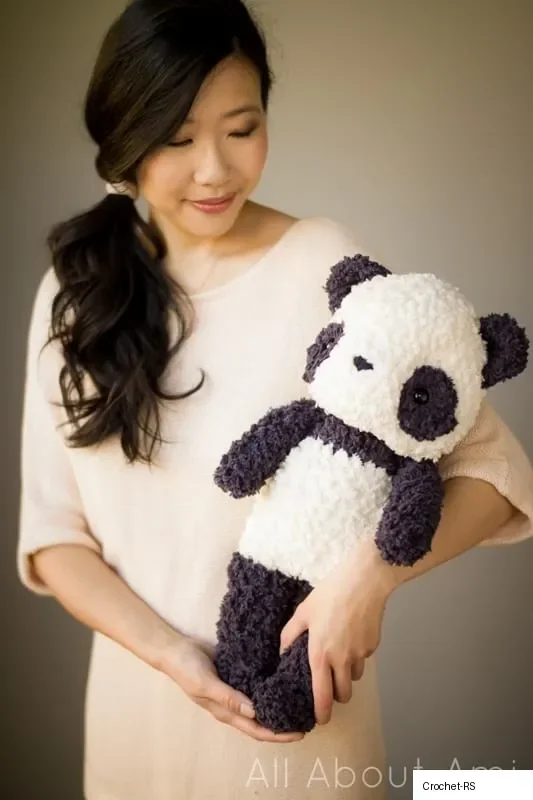
Welcome back to another delightful crochet project! Today, we have an absolutely adorable, wonderfully sweet, and perfectly charming amigurumi pattern for you to try: the cutest little Panda friend! If you love crafting beautiful handmade toys that perfectly capture classic kawaii plush charm while offering a beautifully detailed, lovable design to keep you engaged, this gorgeous little bamboo-munching buddy is going to be your next favorite make.
This fantastic amigurumi pattern is wonderfully adaptable and perfect for unforgettable handmade gifts, allowing you to whip up beautiful, lovable companions in no time that will be cherished as family keepsakes for years! While the instructions highlight a classic black-and-white look, you can easily adjust the color variations depending on the worsted weight yarn used—swap out classic panda colors for magical brights, soft neutrals, or vibrant bold hues to create a whimsical, personalized plush! Grab your hooks, settle into your favorite crafting spot, and let’s dive into making this wonderfully cuddly, completely adorable crochet Panda!

Materials:
- Go For Faux Fleece Sherpa Yarn(level 7 Jumbo) in “Slate” (1 skein = 184 g/89 yds) and “Cream” (2 skeins = 202 g/98 yds); purchase the kitHERE
- 6.50 mm Clover Amour Hook
- Large plastic yarn needle(available throughLion Brand HEREorAmazon HERE) – make sure the eye of the needle is large enough for the jumbo fleece yarn to fit through so you can attach your pieces together
- Fiberfill
- 18 mm safety eyes
- Lock Ring stitch markers
- Black/dark grey worsted weight (level 4) yarn for nose, e.g.Cotton Ease Yarn in “Pewter”
- Hot glue (optional for added security of safety eye)
Notes:
- Finished Dimensions: 19″/48 cm tall; Head = 6.5″/16.4 cm tall, Body + Legs = 12.5″/32 cm tall (after foot shaping)
- Please check out my blog posts entitled “Amigurumi for Beginners“, “How to Read Amigurumi Patterns“, “The Magic Circle“, “The Invisible Decrease“,“The Right Side of Amigurumi” , “How to Crochet Around a Foundation Chain” and “Amigurumi Nose Tutorial” for helpful tips and techniques that you can use when crocheting this amigurumi.
- Work in continuous rounds so there is no visible seam (do not slip stitch after each round) for the head, legs, body and arms. The ears are worked in turned rows.
- Please note which yarn color you are working with for each body part and when you need to switch colors.
- For a cleaner color change when switching yarn colors, work last stitch in old color: work as if typical single crochet until two loops are left on the hook (i.e. insert hook into stitch, yarn over, pull up a loop). Use new color to yarn over and pull through both loops. Work slip stitch in next stitch using new color. Then continue crocheting single crochets as normal with new color. You will be using this technique when switching from white to black yarn in the body.
- When working the color change, there will be a slight color jog. Be sure to position this color jog at the back of the body when you are attaching the head to the body.
- Fluffy yarn is challenging to work with (see tips below), so we will be creating basic shapes without complicated increases or decreases. Then, we will use special shaping techniques to help redefine the face.
- We begin with a simple sphere for the head and will be using these shaping techniques to give more definition: we will doeye indentationandface shaping.
- Eye indentationpulls the safety eyes back to give them more depth. Before you begin crocheting the head, cut two long strands of white yarn (approximately 30”/76 cm each) to use for the eye indentation. Two black eye patches are created by crocheting around a foundation chain. The safety eyes (without the backing) are placed into the black eye patch. A white strand of yarn is tied around the post of the safety eye. Next, the washer of the safety eye is snapped in to secure the safety eye in place. To add extra security, you can add hot glue to the backing so it will not come undone. The black eye patches are then sewn onto the head. The white strands of yarn are pulled back to give more depth (this described in further detail later on).
- Theface shapinginvolves weaving strands of yarn through different parts, pulling tight and tying knots (described in more detail later on). Note that this technique works when using fuzzy yarn as the strands of yarn blend in and become hidden due to the texture of the yarn. We do not recommend using these techniques if you are using regular yarn, as the strands of yarn will be visible. The face shaping is shown asFin the diagram later on, and helps further bring in the eyes/black eye patches and also helps squeeze out and define the cheeks!
- Note that it is important to stuff the head firmly for the eye indentation and face shaping to work.
- Begin with a small loop for the Magic Ring: if you begin with a loop that is too big, it is challenging to pull the ring completely shut with this jumbo fleece yarn.
- Inc (increase)= Work 2 sc in the next stitch. [1 stitch becomes 2 stitches.]
- Dec(I use theinvisible decrease): Insert hook into front loops of the next two stitches. Yarn over and draw through first two loops. Yarn over and draw through remaining two loops.

Fluffy Yarn Tips:
- You will need tofeel for the next stitchand insert your hook into the next gap as you will not be able to see your stitches or where the next space is. Since you cannot see the stitches, this also means that fluffy yarn is more forgiving as you cannot easily see mistakes.
- I highly recommendusing a stitch markerto mark the end of each round. This helps you keep your place in case you need to put down your work or if you get interrupted. You can also use the stitch marker as a guide and reference point for how many stitches you should be making at any given point around the circle. For example, if you know that there are a total of 42 stitches in a round, you should have 21 stitches by the halfway point (halfway across the circle). By the one quarter mark, you should have approximately 10 or 11 stitches. If you do not reach the desired number of stitches by the time you reach the stitch marker, you can frog the stitches (back to the stitch marker) and try again!
- Recordyour number of rounds using a pencil and paper or on your phone. It is very challenging to try and count your rounds when looking at the piece, so it can be very easy to lose your place (unlike amigurumi using regular yarn, where you can easily count how many rounds you have completed and where you are in a pattern).
PATTERN
***Before beginning to crochet, cut two long strands of white yarn(at least 30″/76 cm) and set aside for eye indentation.
EYE PATCH (make 2)
Using black yarn,
Ch 4 (this is the foundation chain),
R1:Starting from second chain from hook, Sc 3 in back loops of foundation chain. Turn and Sc 3 in front loops of the foundation chain [we are making an oval by crocheting around the chain]. (6 sts)
R2:*Inc*, rep 6 times. (12 sts)
Fasten off and leave long end for sewing (at least 15”/38 cm). Eye patch is approximately 3”/7.6 cm across and 2.5”/6 cm tall.
We have created an ovular shape with the final yarn end towards one tip (you can cut the initial yarn end shorter or simply hide it underneath the eye patch as we do not need it). Place 18 mm safety eye in black eye patch as shown in picture collage below. The midpoint of the safety eye is 2”/5 cm away from the tip where final yarn end is located. DO NOT snap in washers yet.
To give the face more definition, we will be using a technique calledeye indentation. After inserting the safety eyes (without attaching washer/backing yet), use the yarn strands you set aside at the beginning and tie knots around the post of each safety eye. Snap in the washers. You can add hot glue to the washer backing for extra security. Set aside the eye patches and have them ready for when it is time to attach them to the head.
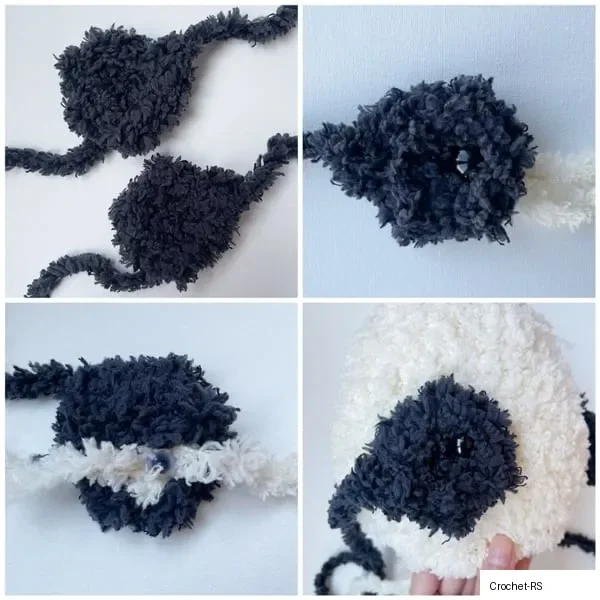
HEAD
Using white yarn,
R1: 6 sc in magic ring. (6 sts)
R2: *Inc*, rep 6 times (12 sts)
R3: *Sc 1, Inc*, rep 6 times. (18 sts)
R4: *Sc 2, Inc*, rep 6 times. (24 sts)
R5: *Sc 3, Inc*, rep 6 times (30 sts)
R6: *Sc 4, Inc*, rep 6 times (36 sts)
R7: *Sc 5, Inc*, rep 6 times (42 sts)
R8-14:Sc 42
R15: *Sc 5, dec*, rep 6 times (36 sts)
R16: *Sc 4, dec*, rep 6 times (30 sts)
R17: *Sc 3, dec* rep 6 times (24 sts)
R18: *Sc 2, dec*, rep 6 times. (18 sts)

Get the eye patches you prepared and place them onto the white head, approximately 3.25”/8.3 cm apart and 2”/5 cm from the bottom of the head opening, as shown in diagram.
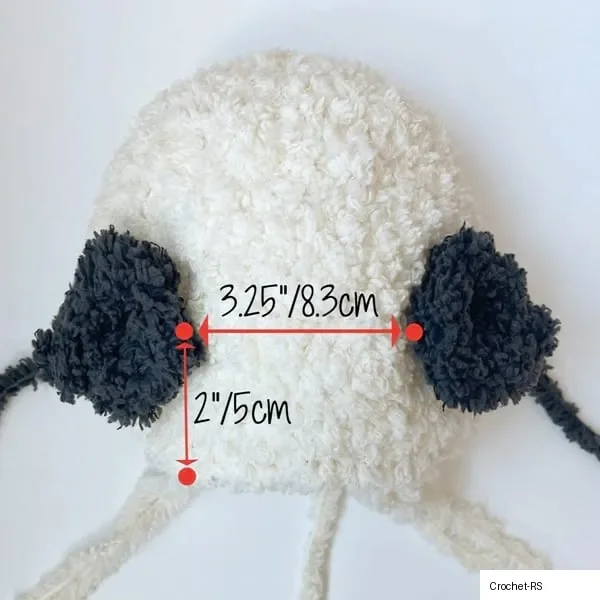
Angle the eye patches so that the final black yarn ends are running diagonally away from the head. Thread the white yarn ends for the eye indentation through the head too. For now, you can keep the white yarn ends towards the bottom of the head to keep them out of the way while you seam the eye patches into place (as shown in collage below). Later on, you will move them towards the back of the head when you prepare them for the eye indentation.
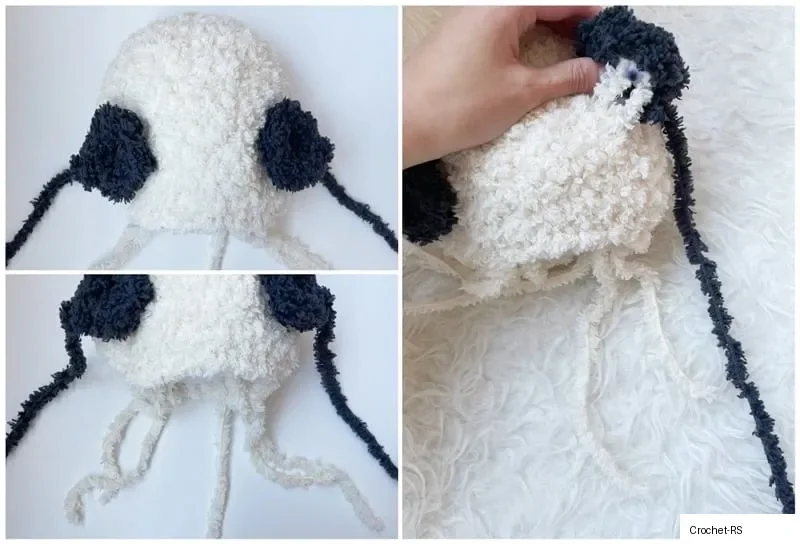
Using black yarn end from the eye patch,seam the eye patches into place. Use the whip stitch, inserting your needle through the black eye patch and then into the white head. When inserting your needle into the white head, try to insert into a spot right below the eye patch and a little bit inwards (toward the center of the eye patch). Try not to insert your needle too much past the eye patch on the white head as this will make your seams more visible and inadvertently expand the size of the eye patch with the black yarn. Tie off end and hide within the head.

Using black worsted weight yarn and needle,embroider noseinto an upside down triangle. Position the nose between the eyes: the top of the nose should be positioned at the midline of the safety eyes. The dimensions of the triangular nose are: 1”/2.5 cm wide and 0.5”/1.3 cm tall.
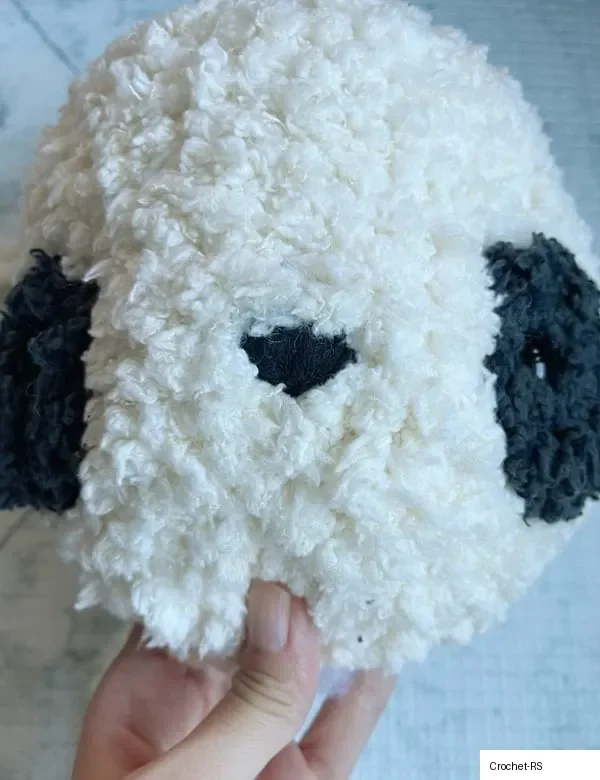
To do theeye indentation, have the white yarn strands cross each other inside the head and have them exit out the back of the head. Ensure that both strands from the SAME safety eye are in close proximity to each other when they exit the back of the head to make it easier to tie a knot (but they should not come out of the same hole). After this is done, you should have 4 strands of yarn coming out the back of the head, each exiting from their own hole.


Stuff head densely, making sure there is stuffing above and below the criss-crossed eye indentation strands. Pull the white yarn strands back to check that you like the look of the eye indentation. You can adjust as needed by stuffing the head more/less or by repositioning the white yarn strands at the back of the head higher or lower. It is important to check this before continuing on and finishing off the head as this cannot be corrected after the head has been closed off in the next rounds.
R19: *Sc 1, dec*, rep 6 times. (12 sts)
Finish stuffing as needed.
R20: *Dec*, rep 6 times. (6 sts)
Fasten off and weave in end.
Finish off the eye indentation with the white yarn strands: grab the two strands of yarn that correlate with one safety eye. Pull back to desired indentation and tie a double knot to secure. Repeat with other eye. Weave in ends.
We will now do someface shaping (F) to further push in the eyes and define the cheeks.Cut two strands of white yarn, approximately 20”/51 cm in length. Insert the needle as shown in diagram from the bottom of the head up towards the white section of the top of the black eye patch. Insert the needle back down towards the bottom of the head so that both yarn ends are exiting the head closely together but not through the same hole.
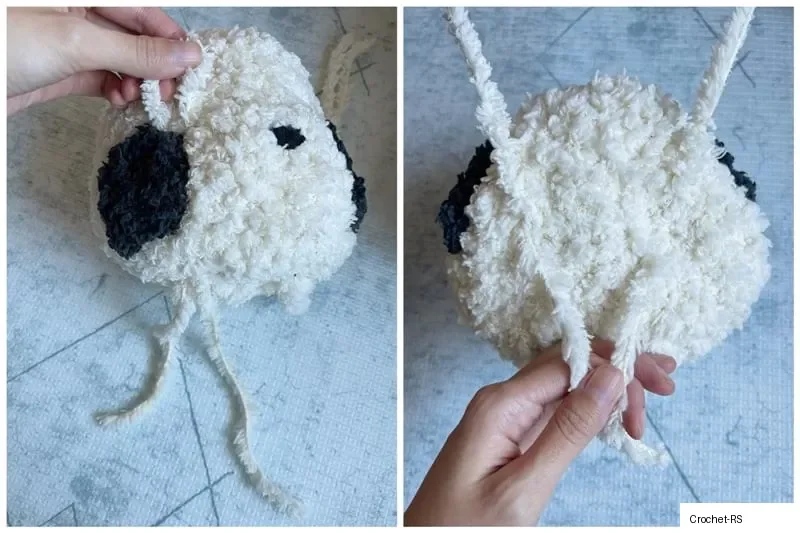

Pull and check to make sure that this further indents the eyes and pushes out the cheeks. Reposition yarn strand if necessary to reach desired look. Once desired look has been achieved, tie these two yarn ends together tightly. Repeat on the other side.
You should now have four yarn ends at the bottom of the head. Hide the two top ends inside the head. Take the two bottom ends and tie them tightly in a knot together. Then hide these two bottom yarn ends.
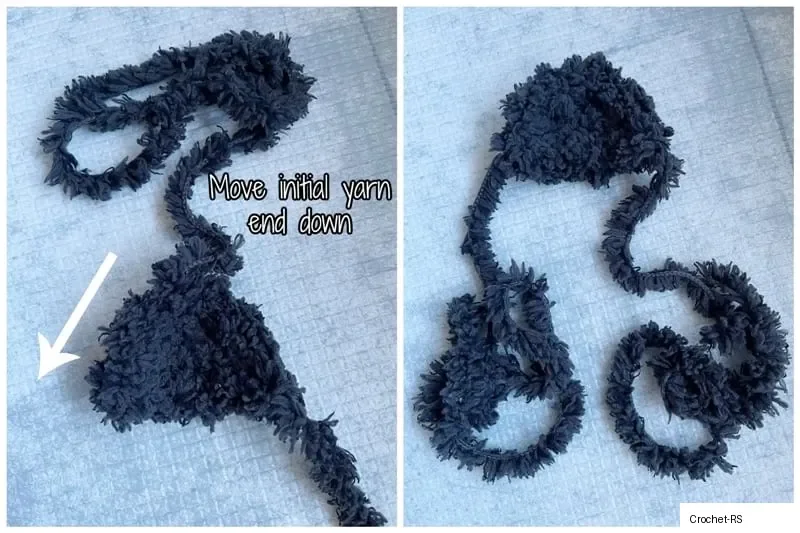
EARS(make 2)
Using black yarn,
Leave long initial end (at least 10”/25 cm long – we will use this end to help secure the ear to the head later on).
Row 1: 4 sc in magic ring. (4 sts) DO NOT close ring – we have created a semi-circle. We will now be working inturned rowsrather than continuous rounds.
Row 2: Chain 1, turn. Starting in second st from hook, *Sc 1, Inc*, rep 2 times. (6 sts)
Row 3: Chain 1, turn. Starting in second st from hook, Sc 6. (6 sts)
Row 4: Repeat Row 3.
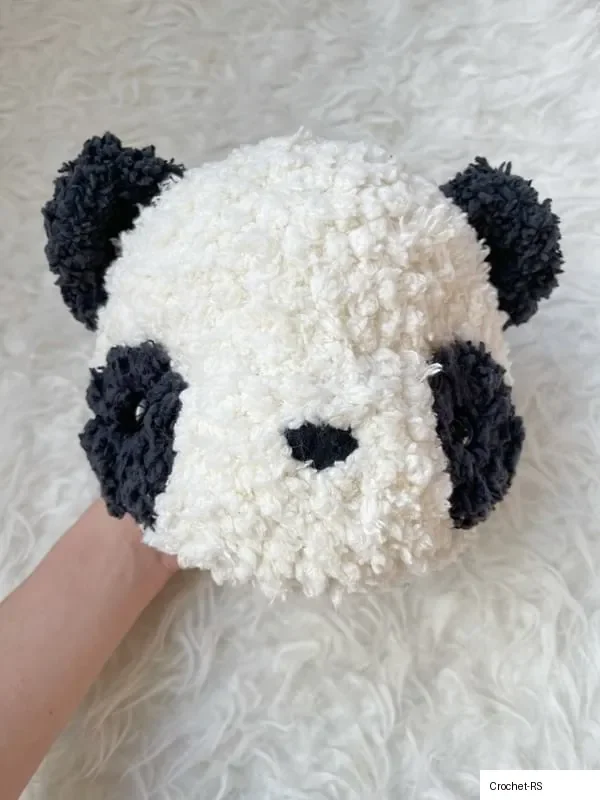
Fasten off and leave long end for sewing. Move initial yarn end down to bottom left corner of ear as shown in next collage. Using the two ends (initial and final end), secure the ears to the head (curve the ears to give more definition). The ears are approximately 5”/12.7 cm apart.

LEGS (make 2)
Using black yarn,
R1: 6 sc in magic ring. (6 sts)
R2: *Sc 2, Inc*, rep 2 times. (8 sts)
R3: Sc 8. (8 sts)
R4: *Sc 3, Inc*, rep 2 times. (10 sts)
R5-7:Sc 10. (10 sts)
R8: *Sc 4, Inc*, rep 2 times. (12 sts)
R9-14: Sc 12. (12 sts)
We will now join the two legs and begin crocheting the body. We will be moving back and forth between the two legs to join them together by forming multiple points of connection. For the first leg, fasten off and leave a long end (at least 15”/38 cm long – we will be using this end to sew the bottom of the body shut later on). For the second leg, DO NOT CUT OFF the yarn. Chain 3 and join with slip stitch to any sc on first leg. *Slip stitch in next sc onsameleg, Chain 3, then slip stitch to next sc onoppositeleg*, repeat a total of 3 times.
During the last slip stitch,switch to white yarn. Your two legs should now be joined together: three stitches on the first leg have been connected to three stitches on the second leg. These three points of connection each consist of chain 3’s that help space the legs apart.
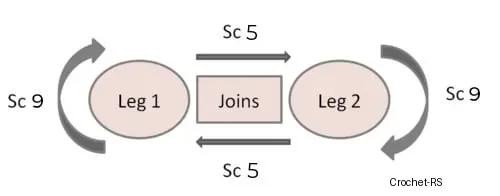
You will now begin working the body in a round as illustrated by this diagram with a total of 28 stitches (first round of body: 9 + 5 + 9 + 5 = 28 sts). Work 5 single crochet stitches across the joins on either side as shown in the diagram:
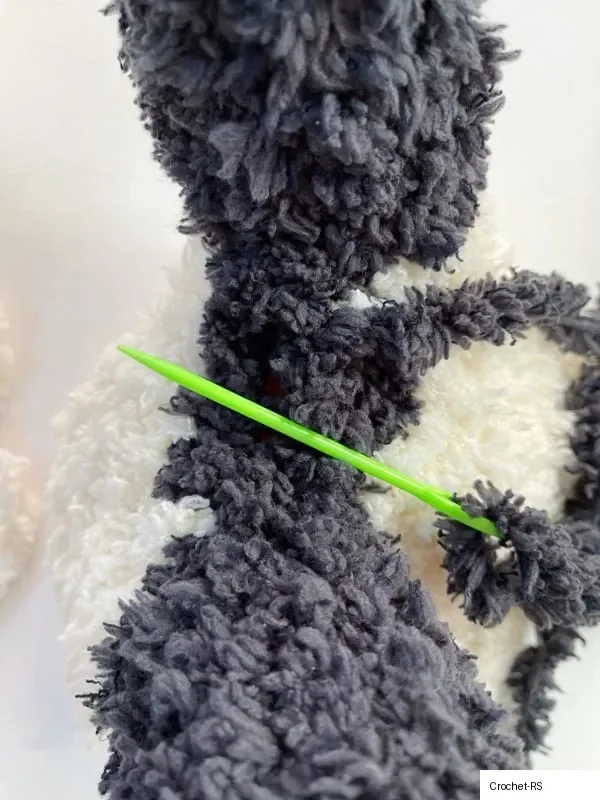
BODY(continues from legs)
R1: Sc 28. (28 sts)
R2: *Sc 3, Inc*, rep 7 times. (35 sts)
R3-7: Sc 35. (35 sts)
Using a yarn needle or crochet hook, move the yarn end from the first leg down to the bottom of the body. Seam the bottom shut so there are no longer any holes or gaps. Use the black yarn to also conceal any white stitches that might seem out of place.
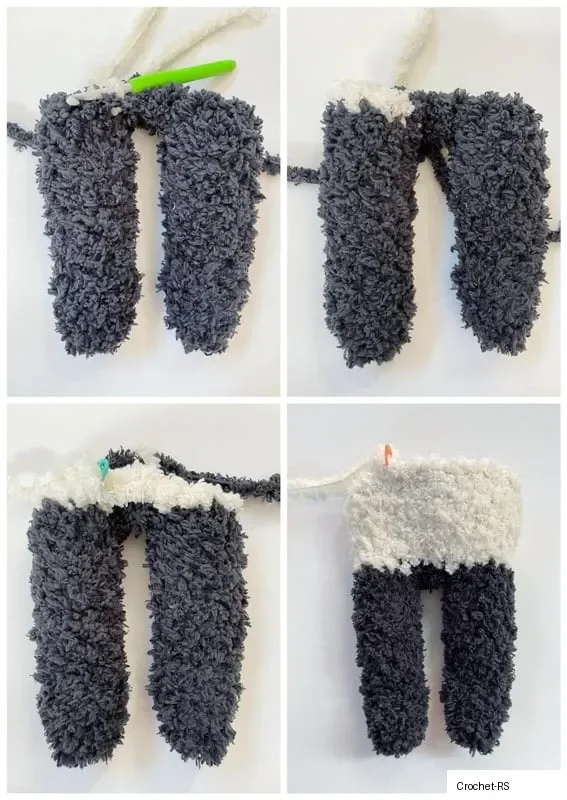
R8: *Sc 3, Dec*, rep 7 times. (28 sts)
R9: Sc 28. (28 sts)
R10: *Sc 2, Dec*, rep 7 times. (21 sts)
Switch to black yarn. [During color change, you can work first stitch in black yarn as slip stitch (rather than single crochet) for a more gradual change (work all subsequent stitches as single crochets).]
R11: *Sc 5, Dec*, rep 3 times. (18 sts)
R12: Sc 18. (18 sts)
R13: *Sc 7, Dec*, rep 2 times. (16 sts).
Fasten off and leave long end for sewing.
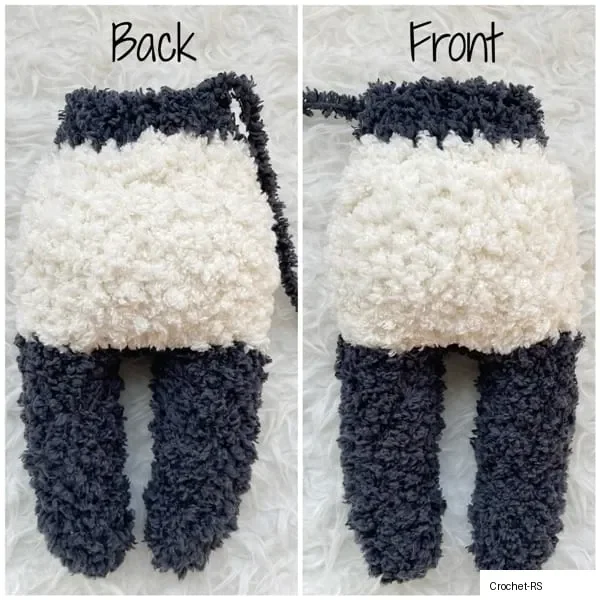
Stuff legs and body densely and seam to head. When choosing which side is the front of the body, have the slight color jog at the back.
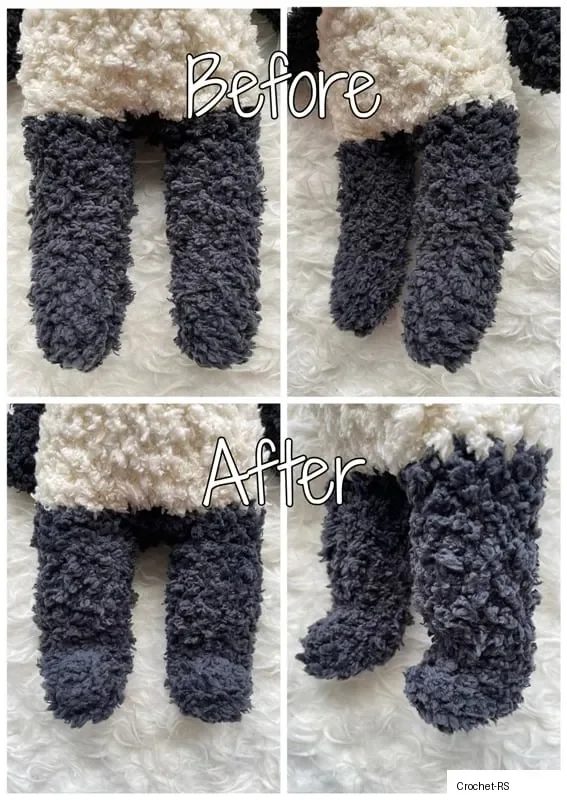
We will now do somefoot shapingto help define the feet from the legs. The top two photos in the collage below show the legsbefore foot shaping. The two bottom photos show the legsafter the foot shapingas the feet have been clearly defined.
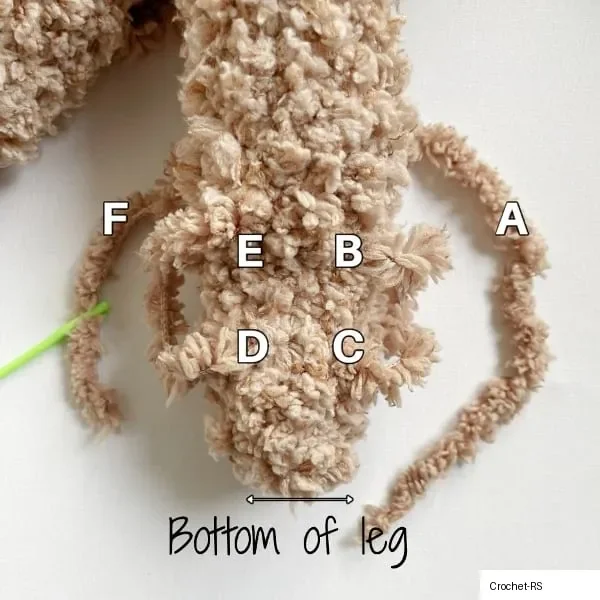
{Photos taken from Fleece Teddy tutorial}
Cut two 20”/51 cm strands of black yarn (one strand for each foot). Please reference the accompanying photos showing thefrontandsideviews of the leg.
Leg Front View:
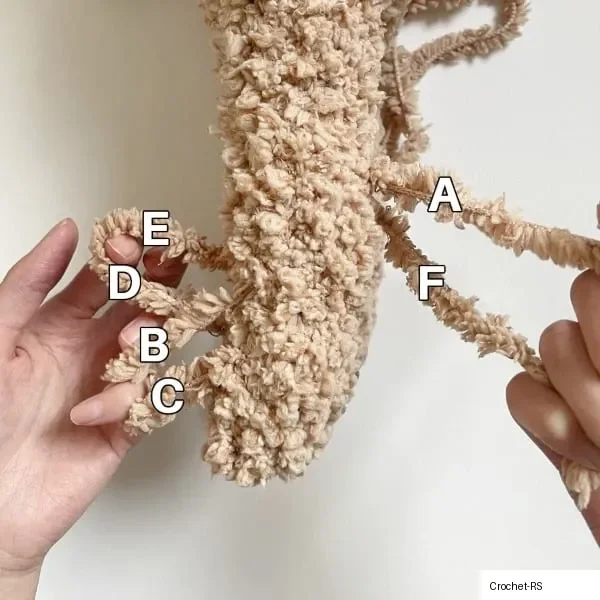
Leg Side View:

The yarn strand will enter the back of the leg atA, exit the front of the leg atB, enter the front of the leg atC, exit the front of the leg atD, enter the front of the leg atEand exit the back of the leg atF.
Please note these distances from the bottom of the leg:
A and F: 5.5”/14 cm
B and E: 3.5”/9 cm
C and D: 2”/5 cm
The distance betweenC and D(and alsoB and E) is approximately: 1”/2.5 cm
Pull the yarn ends (atAandF) back tightly to shape the leg, creating a bend at the foot. Tie knots and hide ends. The foot has now been defined. Repeat for other leg.
ARMS(make 2)
Using black yarn,
R1: 6 sc in magic ring. (6 sts)
R2: *Sc 2, Inc*, rep 2 times. (8 sts)
R3-10: Sc 8. (8 sts)
R11: *Sc 2, Dec*, rep 2 times. (6 sts)
R12:Sc 6. (6 sts)
R13:Repeat Round 12.
Fasten off and leave long end for seaming. You do not need to stuff the arms. Sew onto sides of body.
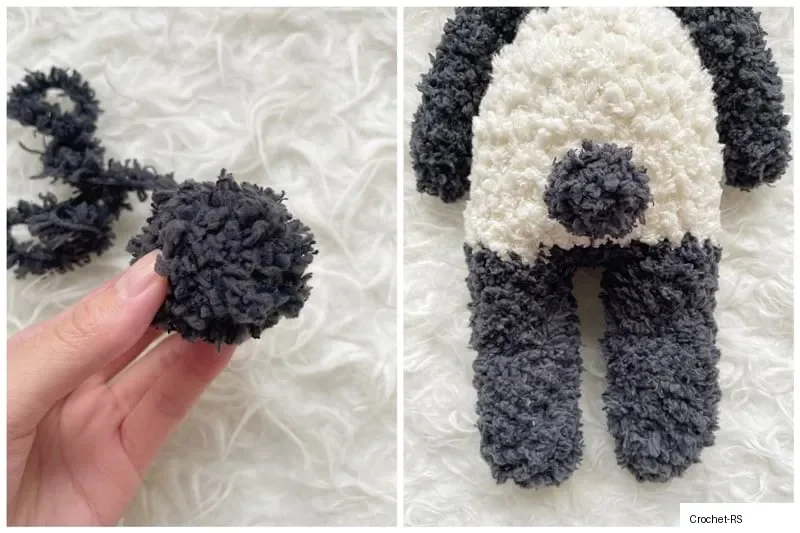
TAIL(optional)
Using black yarn,
R1: 6 sc in magic ring. (6 sts)
R2:*Sc 2, Inc*, rep 2 times. (8 sts)
R3:*Sc 2, dec*, rep 2 times. (6 sts)
Fasten off and leave long for sewing. Sew onto bottom back of body.
****************************