Free Crochet Panda Pattern: Low-Sew Amigurumi Panda Bear
Cuddly Stitches Craft Amigurumi Panda Pattern
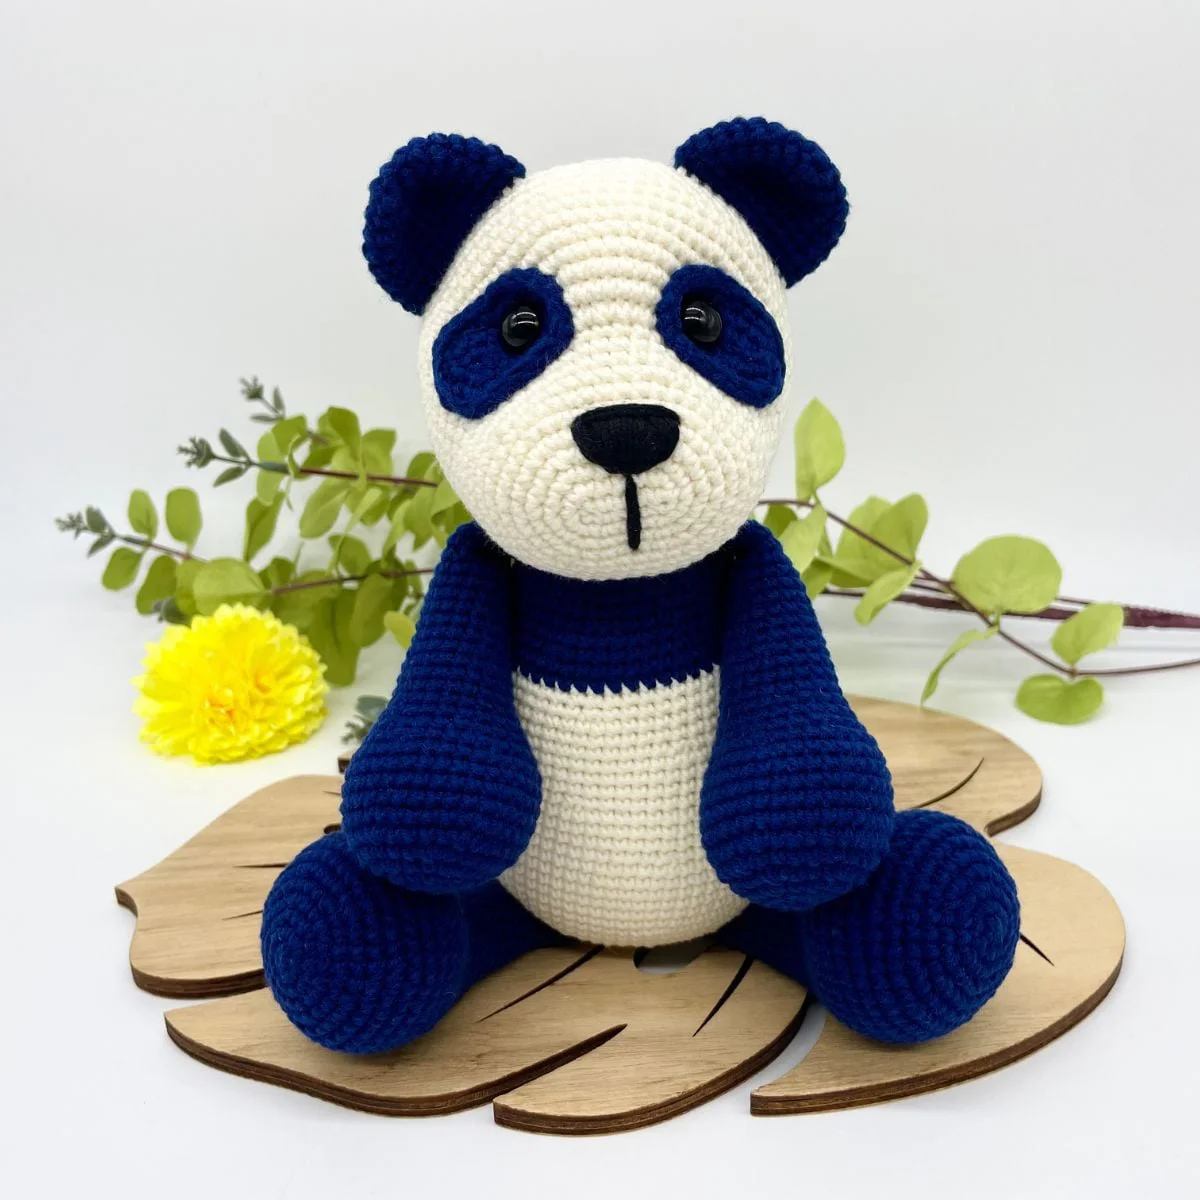
Get ready for another fantastic crochet project! We are absolutely thrilled to share this adorable Amigurumi Panda pattern from Cuddly Stitches Craft. This design features wonderful proportions and an incredibly sweet face that will melt anyone’s heart. It’s a highly satisfying project that results in a beautifully crafted plushie you’ll be proud to show off.
As always, you can customize your panda by using different yarn weights. A chunky blanket yarn will give you a massive, squishy friend, while a standard worsted weight creates a classic plushie. Grab your hooks and let’s get crafting!
Materials and Equipment
Materials needed:
- a long piece of black yarn for nose embroidery (about 35.5 inches / 90 cm)
- polyester fibre fill
Crochet hook size:
- 2.5 mm crochet hook (B-1) for Sport weight yarn (4ply #2)
- 3 mm crochet hook (C-2) for Light worsted weight yarn (DK #3)
- 3.5 mm crochet hook (E-4) for Worsted weight yarn (Aran #4)
- if using a different weight of yarn then refer to the hook size recommendations on the yarn label but go at least one size smaller
I highly recommend this ergonomic crochet hook set from Amazon as it comes in a stylish case and with other handy accessories such as stitch markers etc.
Other equipment needed:
- scissors
- tapestry needle/yarn needle
- pins with large heads
- stitch marker
- 12 mm safety eyes
Pattern Abbreviations
This free crochet panda pattern is written using US terms.
MR: magic ring (magic circle)
ST: stitch
SC: single crochet stitch
CH: chain
SL ST: slip stitch
INV SL ST: invisible slip stitch (refer to ‘special stitches’ section)
INC: increase = two single crochet stitches in the same stitch
INV DEC: invisible decrease (refer to ‘special stitches’ section)
FO: fasten off
INV FO: invisible fasten off (refer to ‘special stitches’ section)
(…..) x 6: repeat the pattern inside the brackets by the given number (in this example, repeat the pattern in the brackets 6 times)
{…}: number shown inside these brackets equals the number of stitches at the end of each round
Special Stitches
INV DEC = invisible decrease:
- insert your hook into the front loop of the next stitch
- then insert your hook into the front loop of the following stitch
- yarn over and draw through the first two loops on the hook (two loops left on the hook)
- yarn over and draw through the remaining two loops on the hook to finish your invisible decrease
INV SL ST = invisible slip stitch – watch this step by step video tutorial on How to crochet invisible slip stitch
INV FO = invisible fasten off – watch this step by step video tutorial on How to crochet invisible fasten off
Video Tutorials
If it is your first time dipping your toes in the world of Amigurumi, then you may find these Amigurumi tutorials handy before you get started with this free crochet pattern.
And don’t forget to watch my step-by-step video tutorials for extra help with my free Amigurumi patterns. Many of my videos also have a left handed version available.
Need Help with this Amigurumi Pattern?
The fastest way to get help with this pattern is to leave your question in the comment box at the bottom of this post.
Free Crochet Panda Pattern: Step by Step Instructions
You can find the free Amigurumi pattern below. I have included lots of pictures to make it easier for you to follow the detailed instructions.
Some sections of the pattern may also include video tutorials with some basic crochet techniques needed for that specific part of the pattern.
Ears
Crochet from the top of the ear downwards
Use navy blue yarn
R1: MR – 6 x SC into the ring {6} – watch this step-by-step video tutorial on How to crochet a magic ring for Amigurumi
R2: INC in each ST around {12}
R3: (SC in next ST, INC) x 6 {18}
R4: SC in next ST, INC, (SC in next 2 STs, INC) x 5, SC in next ST {24}
R5-R8 (4 rounds): SC in each ST around {24}
Do not stuff and fold flat instead
R9: SC the opening together to close the ear {11} – watch this step by step video tutorial on How to close a hole in a flat Amigurumi piece
FO and weave the yarn end in
Eye Patches
Crochet as an oval around a foundation chain and use the invisible slip stitch to join rounds
Use navy blue yarn
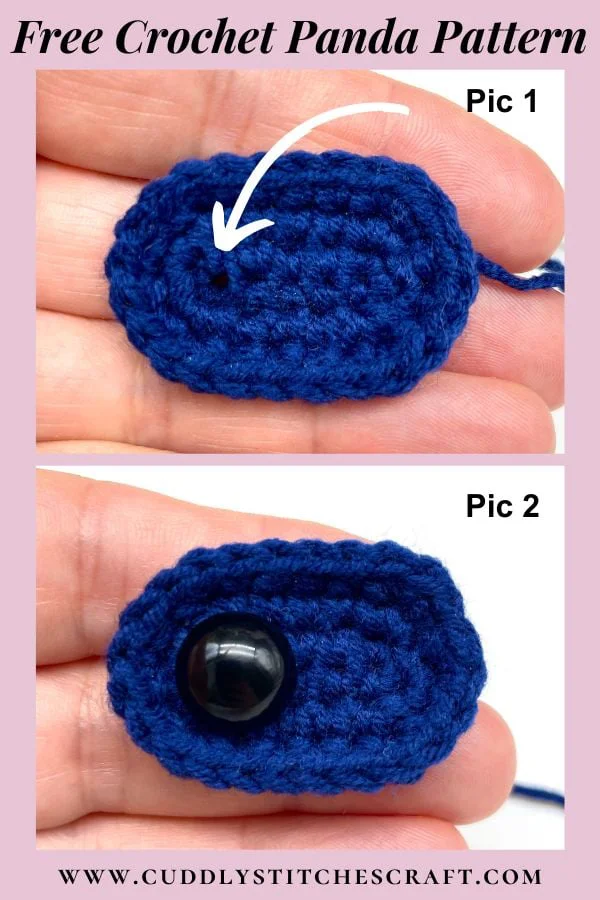
R1: chain 6 STs {6} – make sure the first chain is very loose as you will need to insert the safety eye into it
R2: SC in next 5 CHs starting from second chain from the hook; go through back bump of each CH as well, now work on the opposite side of the chain, INC in next CH, SC in next 3 CHs, INC in last CH {12}
Watch this video tutorial on How to crochet Amigurumi around a foundation chain to help out with R1 to R2 (I crochet in continuous rounds in this video so just watch the first two rounds of the video to help out with this pattern)
R3: INV SL ST into first ST of R2, INC in the same first ST, SC in next 3 STs, INC in next 3 STs, SC in next 3 STs, INC in last 2 STs {18} – watch this video tutorial on How to crochet invisible slip stitch
R4: INV SL ST into first ST of R3, SC in the same first ST, INC in next ST, SC in next 3 STs, (SC in next ST, INC in next ST) x 3, SC in next 3 STs, (SC in next ST, INC in next ST) x 2, INV FO and leave a long tail for sewing the eye patch to the head {24} – watch this video tutorial on How to crochet invisible fasten off
Insert the safety eyes into the first chain of the foundation chain (Pic 1 & 2) and do not put the safety backs on yet. You will sew the patches to the head at a later stage.
Head
Crochet from the front of the snout towards the back of the head
You will attach the ears while crocheting the head
Use white yarn
R1: Chain 6 STs {6} – you can watch the same video tutorial on How to crochet Amigurumi around a foundation chain to help out with R1 to R4
R2: SC in 5 STs starting from 2nd CH from the hook; go through back bump of each CH as well, now work on the opposite side of the chain, INC in next ST, SC in next 3 STs, INC in last ST {12}
R3: INC in first ST, SC in next 3 STs, INC in next 3 STs, SC in next 3 STs, INC in last 2 STs {18}
R4: (SC in next ST, INC) x 1, SC in next 3 STs, (SC in next ST, INC) x 3, SC in next 3 STs, (SC in next ST, INC) x 2 {24}
R5: (SC in next ST, INC) x 1, SC in next 3 STs, (SC in next 2 STs, INC) x 3, SC in next 3 STs, (SC in next 2 STs, INC) x 2, SC in last ST {30}
R6: (SC in next 3 STs, INC) x 1, SC in next 3 STs, (SC in next 3 STs, INC) x 3, SC in next 3 STs, (SC in next 3 STs, INC) x 2 {36}
R7: (SC in next 2 STs, INC) x 1, SC in next 3 STs, (SC in next 4 STs, INC) x 3, SC in next 3 STs, (SC in next 4 STs, INC) x 2, SC in last 2 STs {42}
R8: SC in each ST around {42}
R9: (SC in next 5 STs, INC) x 1, SC in next 3 STs, (SC in next 5 STs, INC) x 3, SC in next 3 STs, (SC in next 5 STs, INC) x 2 {48}
R10-R12 (3 rounds): SC in each ST around {48}
R13: SC in next ST, INC in next 16 STs, SC in next 10 STs, INC in next ST, SC in next 10 STs, INC in next ST, SC in next 9 STs {66}
R14-R16 (3 rounds): SC in each ST around {66} – leave a stitch marker in at the start of R14 as you will need to refer to it when placing the eyes
R17: SC in next 5 STs, INC, (SC in next 10 STs, INC) x 5, SC in next 5 STs {72}
R18-R22 (5 rounds): SC in each ST around {72}
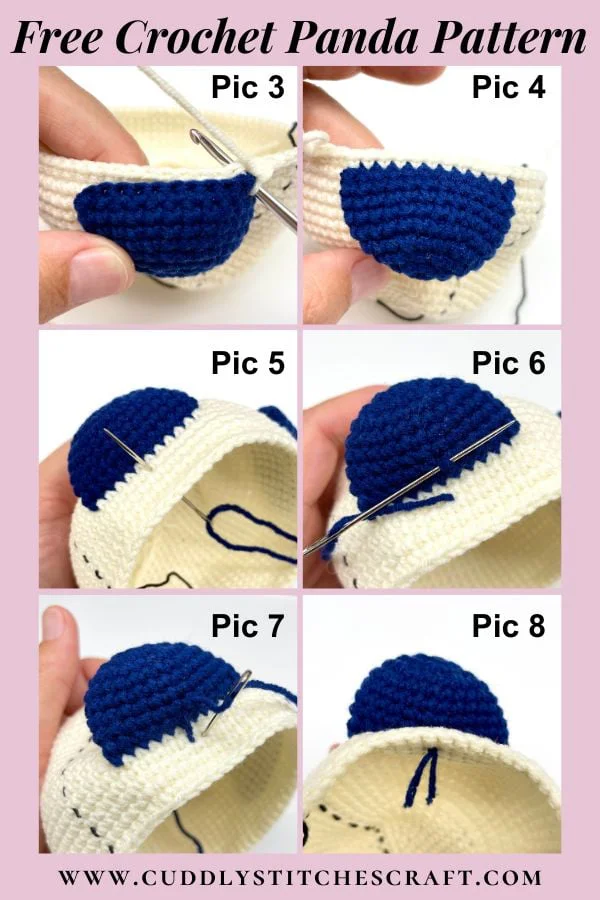
R23: you will attach the ears to the head in this round (Pic 3 & 4) – watch this step by step video tutorial on How to attach ears to your Amigurumi toy without sewing
– SC in next 5 STs
– SC in next 11 STs while attaching the first ear
– SC in next 8 STs
– SC in next 11 STs while attaching the second ear
– SC in next 37 STs {72}
R24-R26 (3 rounds): SC in each ST around {72}
R27: SC in next 5 STs, INV DEC, (SC in next 10 STs, INV DEC) x 5, SC in next 5 STs {66} – watch this step by step video tutorial on How to crochet an invisible decrease
If the ears flop forwards, you can fix them so they stay upright following the steps below:
– thread a tapestry needle with the same navy blue yarn you used to make the ears
– place the needle inside the head and come out through a stitch behind the centre of the ear (Pic 5)
– now pull the needle through a stitch on the back of the ear (somewhere in the middle of the second row from the bottom) (Pic 6)
– and then insert the needle into a stitch next to the one you pulled the needle through behind the ear (Pic 7)
– pull all the way through and come out on the inside of the head
– pull very tight and tie a double knot on the inside of the head (Pic 8)
R28: SC in each ST around {66}
R29: (SC in next 9 STs, INV DEC) x 6 {60}
R30: SC in next 4 STs, INV DEC, (SC in next 8 STs, INV DEC) x 5, SC in next 4 STs {54}
R31: (SC in next 7 STs, INV DEC) x 6 {48}
R32: SC in next 3 STs, INV DEC, (SC in next 6 STs, INV DEC) x 5, SC in next 3 STs {42}
R33: (SC in next 5 STs, INV DEC) x 6 {36}
You can now place the eyes and the eye patches:
– stuff the head well first
– it helps to use pins with large heads to first mark the spots where the eyes will be placed – you can make a decision whether you are happy with the placement and if it looks symmetrical before you insert the safety eyes; the safety eyes usually make a large hole in between the stitches so it is not recommended to change the placement of the eyes once they are in (Pic 9)
– place the eyes between rounds R14 and R15
– first eye – count 9 stitches from your marker at the start of R14 and place the eye between ST9 and ST10
– second eye – count 25 stitches from your marker at the start of R14 and place the eye between ST25 and ST26
– you can now insert the safety eyes with the eye patches to make sure you are happy with the look. But do not put the safety backs on yet (Pic 10)
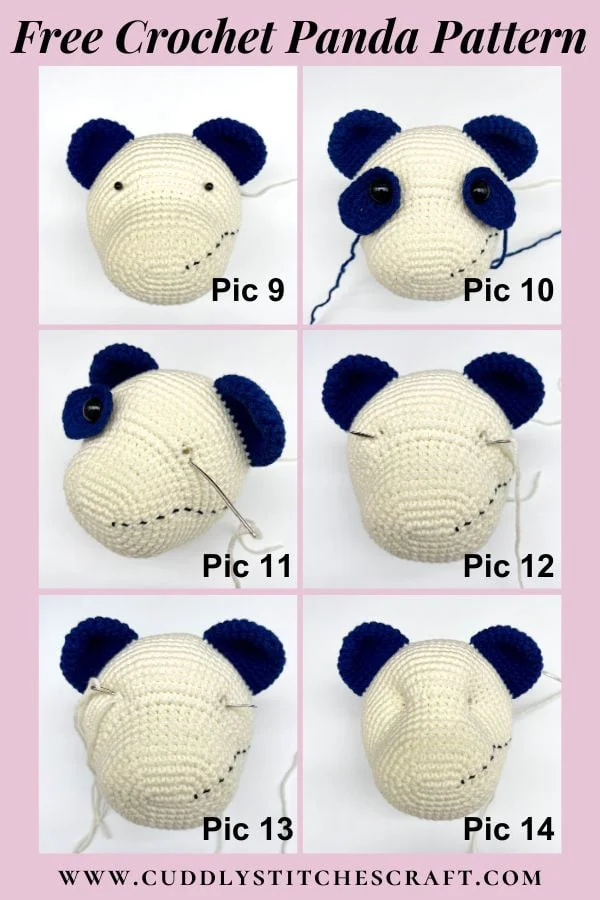
Sculpting the eyes (indented eye look):
– watch this step by step video tutorial on How to indent eyes in Amigurumi
– take a long piece of white yarn and thread your needle
– remove the left eye and patch and insert the needle in a stitch next to the left eye hole (Pic 11)
– remove the right eye and patch and come across the side with the needle and insert it into a stitch next to the right eye hole (Pic 12); pull all the way through till the yarn tail is not showing
– insert the needle into another stitch next to the right eye and come across the side with the needle again (Pic 13)
– repeat the process back and forth between the two eye holes while pulling on the yarn tightly each time you come across the side
– you will need to repeat this about three times until you achieve the indented eye look you want and then you can weave the yarn in (Pic 14)
– place the eyes and patches back in the holes; remove some or most of the stuffing and place the safety backs on making sure they snap in place tightly
– you can now re-stuff the head and continue crocheting R34
– continue to stuff the head gradually
R34: SC in next 2 STs, INV DEC, (SC in next 4 STs, INV DEC) x 5, SC in next 2 STs {30}
R35: (SC in next 3 STs, INV DEC) x 6 {24}
R36: SC in next ST, INV DEC, (SC in next 2 STs, INV DEC) x 5, SC in next ST {18}
R37: (SC in next ST, INV DEC) x 6 {12}
R38: SC in each ST around {12}
Stuff well, close the hole using a tapestry needle and weave the yarn end in.
Watch this step by step video tutorial on How to close a hole in an Amigurumi piece
You can now sew on the eye patches. I attached them between R10 and R19 at about a 45° angle.
Nose Embroidery
– embroider the nose using a long piece of black yarn – about 90 cm / 35.5 inches long
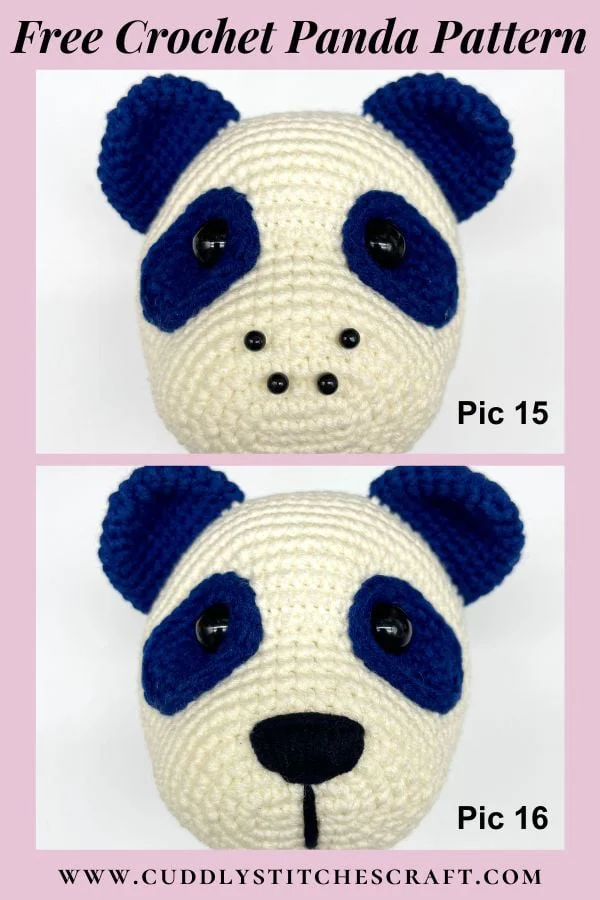
– mark the shape and placement of the nose with pins first before you start embroidering (Pic 15)
– I embroidered the nose between R4 and R7 of the head; leaving 5 stitches between the pins at the top and 3 stitches between the pins at the bottom (Pic 16)
– watch this step by step video tutorial on How to embroider a nose on an Amigurumi toy
Arms (Front Legs)
Crochet from the bottom of the arm upwards
Use navy blue yarn
R1: Magic ring – 6 x SC into the ring {6}
R2: INC in each ST around {12}
R3: (SC in next ST, INC) x 6 {18}
R4: SC in next ST, INC, (SC in next 2 STs, INC) x 5, SC in next ST {24}
R5: (SC in next 3 STs, INC) x 6 {30}
R6: SC in next 2 STs, INC, (SC in next 4 STs, INC) x 5, SC in next 2 STs {36}
R7-R11 (5 rounds): SC in each ST around {36}
R12: SC in next 2 STs, INV DEC, (SC in next 4 STs, INV DEC) x 5, SC in next 2 STs {30}
R13: (SC in next 3 STs, INV DEC) x 6 {24}
R14: SC in each ST around {24}
R15: SC in next 3 STs, INV DEC, (SC in next 6 STs, INV DEC) x 2, SC in next 3 STs {21}
R16-R18 (3 rounds): SC in each ST around {21}
You can now start stuffing the arm
R19: (SC in next 5 STs, INV DEC) x 3 {18}
R20-R21 (2 rounds): SC in each ST around {18}
R22: INV DEC, SC in next 16 STs {17}
R23-R24 (2 rounds): SC in each ST around {17}
R25: INV DEC, SC in next 15 STs {16}
You can now stop stuffing the arm
R26-R27 (2 rounds): SC in each ST around {16}
R28: INV DEC, SC in next 14 STs {15}
R29-R31 (3 rounds): SC in each ST around {15}
R32: SC the opening together to close the arm {7}
FO and weave the yarn end in
Legs (Hind Legs)
Crochet from the bottom of the leg upwards
Use navy blue yarn
R1: Magic ring – 6 x SC into the ring {6}
R2: INC in each ST around {12}
R3: (SC in next ST, INC) x 6 {18}
R4: SC in next ST, INC, (SC in next 2 STs, INC) x 5, SC in next ST {24}
R5: (SC in next 3 STs, INC) x 6 {30}
R6: SC in next 2 STs, INC, (SC in next 4 STs, INC) x 5, SC in next 2 STs {36}
R7: (SC in next 5 STs, INC) x 6 {42}
R8: (SC in next 13 STs, INC) x 3 {45}
R9-R13 (5 rounds): SC in each ST around {45}
R14: SC in next 8 STs, INV DEC, SC in next 4 STs, INV DEC, (SC in next 3 STs, INV DEC) x 3, SC in next 4 STs, INV DEC, SC in next 8 STs {39}
R15: SC in next 8 STs, INV DEC, SC in next 3 STs, INV DEC, (SC in next 2 STs, INV DEC) x 3, SC in next 3 STs, INV DEC, SC in next 7 STs {33}
R16: SC in next 8 STs, INV DEC, SC in next 2 STs, INV DEC, (SC in next ST, INV DEC) x 3, SC in next 2 STs, INV DEC, SC in next 6 STs {27}
R17: SC in each ST around {27}
You can now start stuffing the leg
R18: (SC in next 7 STs, INV DEC) x 3 {24}
R19: SC in each ST around {24}
R20: SC in next 3 STs, INV DEC, (SC in next 6 STs, INV DEC) x 2, SC in next 3 STs {21}
R21-R22 (2 rounds): SC in each ST around {21}
R23: (SC in next 5 STs, INV DEC) x 3 {18}
R24-R25 (2 rounds): SC in each ST around {18}
R26: SC in next 2 STs, INV DEC, (SC in next 4 STs, INV DEC) x 2, SC in next 2 STs {15}
You can now stop stuffing the leg
R27-R28 (2 rounds): SC in each ST around {15}
R29: SC in next 14 STs and don’t finish the round {14}
R30: SC the opening together to close the leg {7}
FO and weave the yarn tail in
Tail
Crochet from the bottom of the tail upwards
Use white yarn
R1: Chain 4 STs {4} – watch this step by step video tutorial to help out with R1 to R4 – the video starts with a different number of chains but the technique is the same: How to crochet Amigurumi around a foundation chain
R2: SC in 3 STs starting from 2nd CH from the hook; go through back bump of each CH as well, now work on the opposite side of the chain, INC in next ST, SC in next ST, INC in last ST {8}
R3: INC in first ST, SC in next ST, INC in next 3 STs, SC in next ST, INC in last 2 STs {14}
R4: (SC in next ST, INC) x 1, SC in next ST, (SC in next ST, INC) x 3, SC in next ST, (SC in next ST, INC) x 2 {20}
R5: (SC in next 2 STs, INC) x 1, SC in next ST, (SC in next 2 STs, INC) x 3, SC in next ST, (SC in next 2 STs, INC) x 2 {26}
R6-R7 (2 rounds): SC in each ST around {26}
R8: (SC in next 2 STs, INV DEC) x 1, SC in next ST, (SC in next 2 STs, INV DEC) x 3, SC in next ST, (SC in next 2 STs, INV DEC) x 2 {20}
R9-R10 (2 rounds): SC in each ST around {20}
R11: (SC in next ST, INV DEC) x 1, SC in next ST, (SC in next ST, INV DEC) x 3, SC in next ST, (SC in next ST, INV DEC) x 2 {14}
R12: SC in each ST around {14}
Stuff the tail but don’t stuff it too much otherwise it will be difficult to crochet it close
R13: SC in next ST and then SC the opening together to close the tail {6}
FO and weave the yarn tail in
Body
Crochet from the bottom of the body to the top
Attach the arms, legs and tail as you crochet along
Use both white and navy blue yarn but start with the white yarn
R1: MR – 6 x SC into the ring {6}
R2: INC in each ST around {12}
R3: (SC in next ST, INC) x 6 {18}
R4: SC in next ST, INC, (SC in next 2 STs, INC) x 5, SC in next ST {24}
R5: (SC in next 3 STs, INC) x 6 {30}
R6: SC in next 2 STs, INC, (SC in next 4 STs, INC) x 5, SC in next 2 STs {36}
R7: (SC in next 5 STs, INC) x 6 {42}
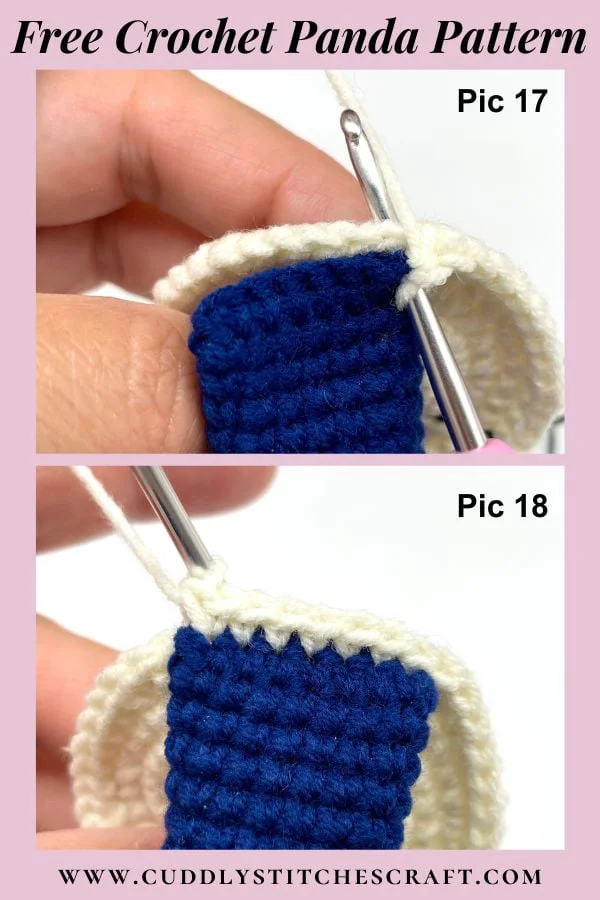
R8: you will attach the legs to the body in this round (Pic 17 & 18) – watch this video tutorial on How to attach legs to your Amigurumi toy without sewing
– SC in next 3 STs, INC, SC in next 6 STs, INC
– you will now attach the first leg: SC in next 6 STs, INC
– SC in next 6 STs, INC
– you will now attach the second leg: SC in next 6 STs, INC
– SC in next 6 STs, INC, SC in next 3 STs {48}
R9: (SC in next 7 STs, INC) x 6 {54}
R10: SC in next 4 STs, INC, (SC in next 8 STs, INC) x 5, SC in next 4 STs {60}
R11: (SC in next 9 STs, INC) x 6 {66}
R12: SC in next 5 STs, INC, (SC in next 10 STs, INC) x 5, SC in next 5 STs {72}
R13: SC in each ST around {72}
R14: (SC in next 11 STs, INC) x 6 {78}
R15: SC in each ST around {78}
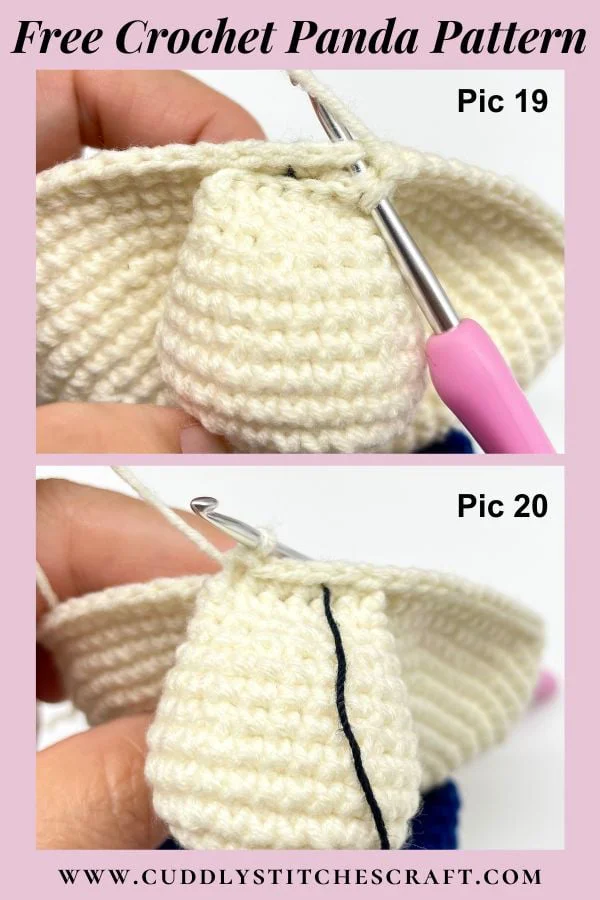
R16: you will start attaching the tail to the body towards the end of this round (Pic 19 & 20) – watch this step by step video tutorial on How to attach a tail to your Amigurumi toy without sewing
– SC in next 76 STs
– SC in next 2 STs while starting to attach the tail {78}
R17: you will finish attaching the tail to the body in this round
– SC in next 4 STs while attaching the remainder of the tail
– SC in next 74 ST {78}
R18-R20 (3 rounds): SC in each ST around {78}
R21: (SC in next 11 STs, INV DEC) x 6 {72}
R22-R24 (3 rounds): SC in each ST around {72}
R25: SC in next 5 STs, INV DEC, (SC in next 10 STs, INV DEC) x 5, SC in next 5 STs {66}
R26-R28 (3 rounds): SC in each ST around {66}
R29: (SC in next 9 STs, INV DEC) x 6 {60}
You can now start stuffing the body and continue to stuff gradually
R30-R31 (2 rounds): SC in each ST around {60}
R32: SC in next 4 STs, INV DEC, (SC in next 8 STs, INV DEC) x 5, SC in next 4 STs {54}
R33: SC in each ST around {54}
R34: SC in next 3 STs, color change – change yarn to navy blue, SC in next 51 STs {54}
R35: SC in each ST around {54}
R36: (SC in next 7 STs, INV DEC) x 6 {48}
R37: SC in each ST around {48}
R38: SC in next 3 STs, INV DEC, (SC in next 6 STs, INV DEC) x 5, SC in next 3 STs {42}
R39: SC in each ST around {42}
R40: (SC in next 5 STs, INV DEC) x 6 {36}
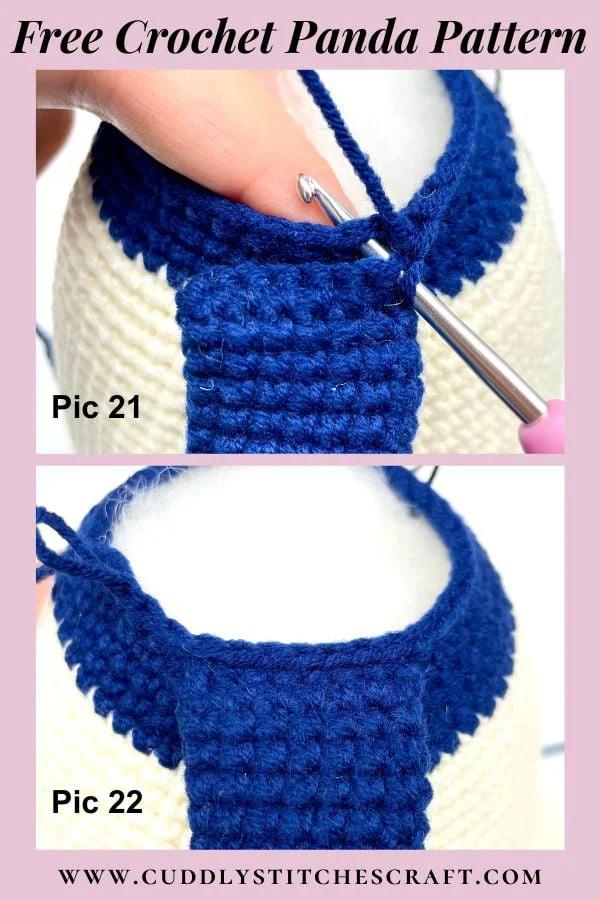
R41: you will attach the arms to the body in this round (Pic 21 & 22) – watch this step by step video tutorial on How to attach arms to your Amigurumi toy without sewing
– SC in next 9 STs
– SC in next 7 STs while attaching the first arm
– SC in next 11 STs
– SC in next 7 STs while attaching the second arm
– SC in next 2 STs {36}
R42: SC in next 2 STs, INV DEC, (SC in next 4 STs, INV DEC) x 5, SC in next 2 STs {30}
R43: SC in each ST around {30}
FO leaving a long tail for sewing, stuff well
How to Assemble Your Crochet Panda Softie
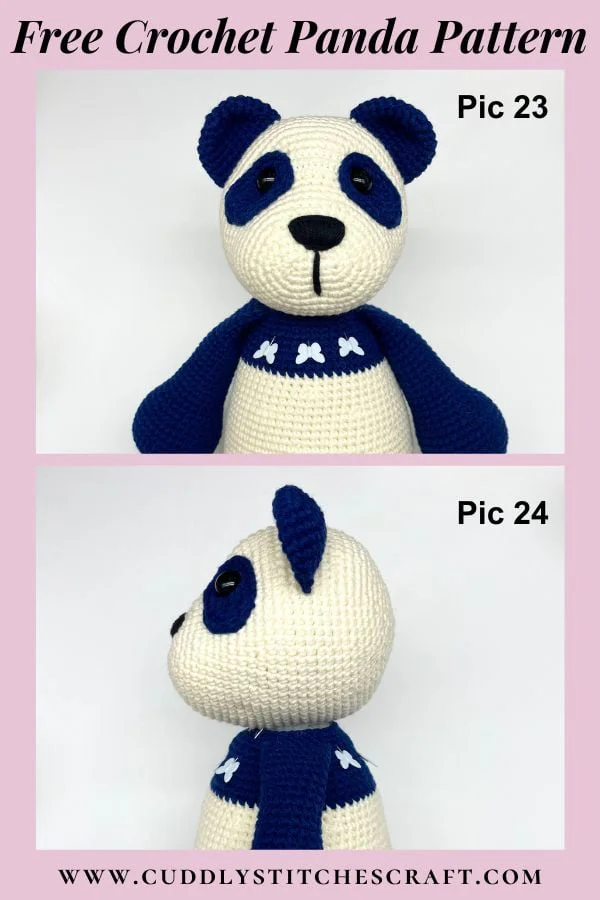
Attaching the head to the panda’s body: Pin the head to the body first making sure that the head is in the centre from the front and back (Pic 23 & 24). Sew the head to the body while adding more stuffing so the head is not wobbly.