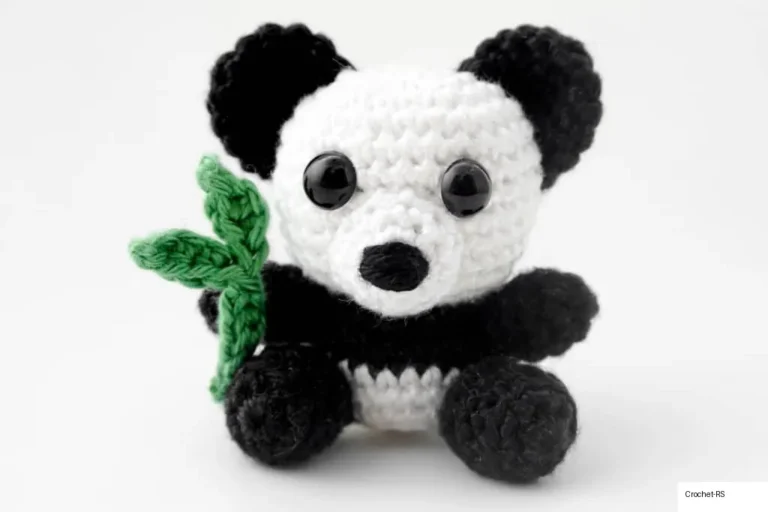
Paige The Panda Crochet Pattern (FREE!)
Desert Blossom Crafts Free Panda Pattern
This fantastic free crochet pattern by Desert Blossom Crafts will walk you through creating an adorable, pocket-sized panda! The pattern features a classic two-tone aesthetic with perfectly rounded proportions, making it an ideal desk buddy or a sweet little gift. The simple shapes used in this design mean it works up relatively quickly while still delivering huge on charm.
As always, you can customize your panda by using different yarn weights. A chunky blanket yarn will give you a massive, squishy friend, while a standard worsted weight creates a classic plushie. Grab your hooks and let’s get crafting!
Materials:
- DK weight yarn: approx. 100 grams white and black
- 3.5mm crochet hook
- You can also try using worsted weight yarn & a 4 or 4.5mm hook, but the plushie size will vary depending on your tension.
- 10-mm brown safety eyes (or embroider the eyes for children under 3)
- Black safety nose
- Fiber filling
- Yarn needle & stitch marker
Gauge and Tension:
Exact gauge is not critical for this pattern. Keep tension normal—do not work with a loose tension. You can always adjust your hook size if need be. For example, if you crochet loosely and you find the amigurumi is looking holey, go down a hook size.
Notes:
- All body parts are crocheted separately and then sewn together according to the finishing instructions.
- All parts are made in continuous rounds. Do not join at the end of each round unless otherwise specified.
- Turning chain does not count as a stitch.
- Place a stitch marker at the end of each round and move it up as you go.
- When a number is placed after a stitch it means that you should single crochet in each of the next number of stitches. (i.e. sc 7 means single crochet in each of next 7 sts)
- You will need to know how to change colors in amigurumi to make this pattern. Learn the different color change methods here. You can use whichever method you like best.

Measurements/Sizing:
Height: 8-9”
Abbreviations/Stitches Used (U.S.)
Chain – ch
Slip stitch – sl st
Single crochet – sc
Half double crochet – hdc
Double crochet – dc
Repeat – rep
Stitch(es) – st(s)
Single crochet increase – inc
Invisible decrease – inv dec
Invisible half double crochet decrease – inv hdc dec
Round – rnd
Special Stitches:
Invisible single crochet decrease (inv dec): video tutorial here
Insert hook into front loop of first stitch, insert hook into front loop of the next stitch, yarn over, pull through both sts (2 loops on hook), yarn over and pull through all loops on hook to complete stitch.
Invisible half double crochet decrease (inv hdc dec):
YO, insert hook into front loop of first stitch, insert hook into front loop of the next stitch, yarn over, pull through both sts (2 loops on hook), yarn over and pull through all 3 loops on hook to complete stitch.
Single Crochet Increase (inc):
Make 2 sc in indicated stitch.
Panda Bear Crochet Pattern Instructions
Legs – Make 2 in black
Chart for first 3 rounds:
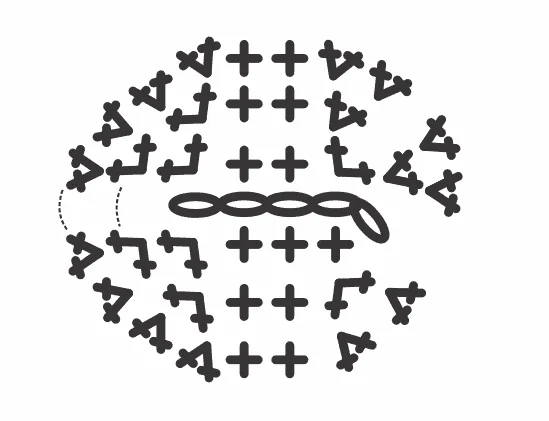
Ch 5.
Rnd 1: Inc in second ch from hook. Sc 2, 4 sc into next ch. Turn to work along opposite side of ch. Sc 3. (11)
Rnd 2: (Inc) x2, sc 2. (Inc) x4, sc 2. Inc in last st. (18)
Rnd 3: (Inc) x4, sc 2. (Inc) x8, sc 2. (Inc) x2. (32)
Rnds 4-5: Sc in each st around. (32)
Rnd 6: Sc 12, (inv hdc dec) x6. Sc 8. (26)
Rnd 7: Sc 12, (inv hdc dec) x3. Sc 8. (23)
Rnd 8: (Sc 2, inv dec) x3. Sc 3. (Sc 2, inv hdc dec) x2. (18)
Rnds 9-16: Sc in each st around. (18)
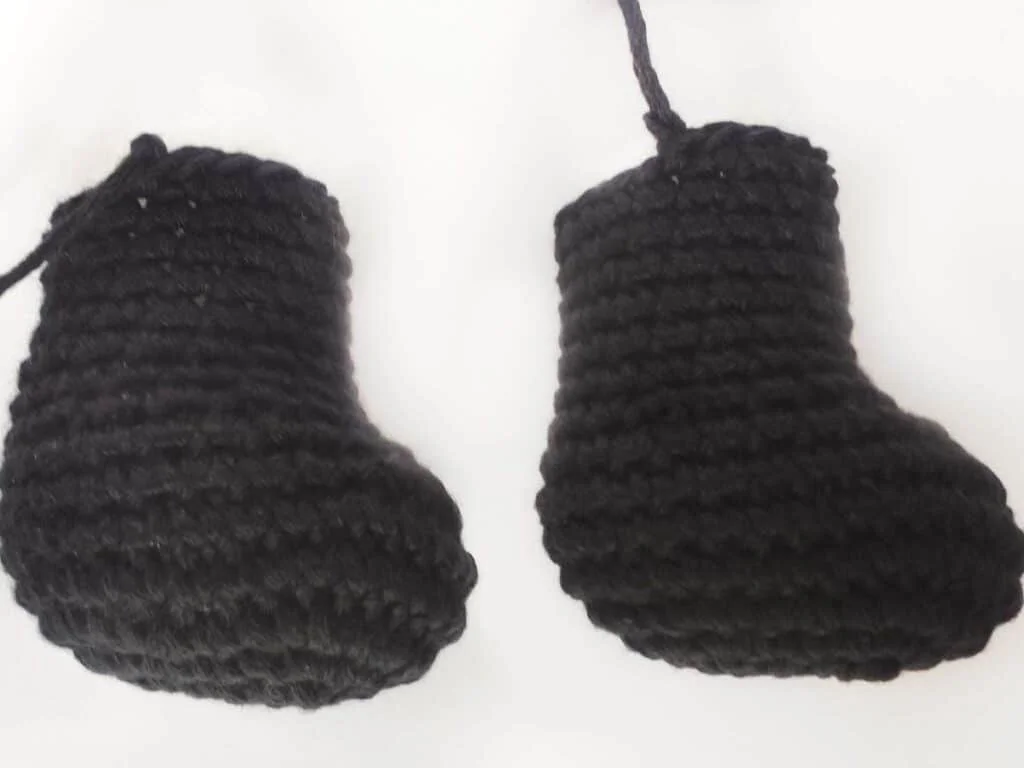
Fasten off. Fill with stuffing. Do not sew opening closed.
Finished legs:
Arms – Make 2 in black
Make a magic ring.
Rnd 1: 8 sc into ring. (8)
Rnd 2: (Inc) x8. (16)
Rnd 3: (Inc, sc 1) x8. (24)
Rnds 4-6: Sc 12, hdc 12. (24)
Rnd 7: Sc 12. (Inv hdc dec) x6. (18)
Rnds 8-17: Sc in each st around. (18)
Rnd 18: (Sc 4, inv dec) x3. (15)
Rnd 19: (Sc 3, inv dec) x3. (12)
Rnd 20: (Sc 2, inv dec) x3. (9)
Fasten off. Fill with stuffing. Sew opening closed.
Finished arms:

Ears – Make 2 in black
Make a magic ring.
Rnds 1-2: 8 sc into ring. (8)
Rnd 3: (Inc) x8. (16)
Rnds 4-6: Sc in each st around. (16)
Fasten off. Do not fill with stuffing.
Finished ears:

Body – in white and black
With white yarn, make a magic ring.
Rnd 1: 8 sc into ring. (8)
Rnd 2: (Inc) x8. (16)
Rnd 3: (Inc, sc 1) x8. (24)
Rnd 4: (Inc, sc 2) x8. (32)
Rnd 5: (Inc, sc 3) x8. (40)
Rnd 6: (Inc, sc 4) x8. (48)
Rnds 7-16: Sc in each st around. (48)
Rnd 17: (Sc 10, inv dec) x4. (44)
Rnd 18: (Sc 9, inv dec) x4. (40)
Rnds 19-21: Sc in each st around. (40) Change to black.
Rnd 22: Sc in each st around. (40)
Rnd 23: (Sc 6, inv dec) x5. (35)
Rnd 24: (Sc 5, inv dec) x5. (30)
Rnd 25: (Sc 4, inv dec) x5. (25)
Fasten off. Fill with stuffing. Do not sew opening closed.
Finished body:

Head – in white
Make a magic ring.
Rnd 1: 8 sc into ring. (8)
Rnd 2: (Inc) x8. (16)
Rnd 3: (Inc, sc 1) x8. (24)
Rnd 4: (Inc, sc 2) x8. (32)
Rnd 5: (Inc, sc 3) x8. (40)
Rnd 6: (Inc, sc 4) x8. (48)
Rnds 7-16: Sc in each st around. (48)
Rnd 17: (Inv dec, sc 4) x8. (40)
Rnd 18: (Inv dec, sc 3) x8. (32)
Rnd 19: (Inv dec, sc 2) x8. (24)
Rnd 20: (Inv dec, sc 1) x8. (16) Fill with stuffing here.
Rnd 21: (Inv dec) x8. (8)
Rnd 22: (Inv dec) x4. (4)
Fasten off. Sew opening closed.
Finished head:

Eyes – in black, make 1 left and 1 right
Left:
Make a magic ring.
Rnd 1: 8 sc into ring. (8)
Rnd 2: (Inc) x8. (16)
Rnd 3: Sc 1, inc, hdc 1, 2 hdc in next st. Dc 1, 2 dc in next st. Leave remaining sts unworked. (9)
Fasten off. Attach the safety eye in the middle of the magic ring.
Right:
Rnds 1-2: Repeat as for left eye.
Rnd 3: Ch 3 (counts as a dc here only). Dc 1 in same space. Dc 1, 2 hdc in next st, hdc 1. Inc, sc 1. Leave remaining sts unworked. (9)
Fasten off. Attach the safety eye in the middle of the magic ring.
Finished eyes:

Muzzle – in white
Make a magic ring.
Rnd 1: 9 sc into ring. (9)
Rnd 2: (Inc, sc 2) x3. (12)
Rnd 3: (Inc, sc 3) x3. (15)
Rnds 4-5: Sc in each st around. (15)
Fasten off. Fill with stuffing. Do not close opening. Attach the nose between rnds 2 and 3. Embroider a little cute smile.
Finished Muzzle:

Finishing
- Attach eyes between rnd 9 and 16.
- Attach muzzle between rnd 12 and 16.
- Attach ears between rnd 5 and 10.
- Attach arms and legs to the body. Finally, attach head to body.